Individually addressable LEDs are quite popular these days. Unfortunately you're stuck between two extremes if you want some of your own: either you get consumer-grade ones with very limited programmability, or you spend hundreds of dollars on a professional-grade solution which is overkill if you just want the ability to have a simple string of lights.
This is an Arduino-based addressable LED controller with a mobile-and-desktop-friendly web GUI. It's designed for fully custom holiday lights but can be adapted for other uses such as PC lighting. Use it out of the box (with some minimal configuration) or modify the source code for a truly 100% custom experience while learning along the way.
These aren't limited to Christmas (or Halloween) use. Run them year round for all of the holidays, display the colors of your country or favorite sportsball team, or just use them for landscape lighting – the sky's the limit!
Features
- Truly custom colors and patterns. You aren't limited to just a few predefined patterns or the claimed "millions of colors" that can only be selected one at a time.
- Multiple animations or static display if you want to keep it simple
- Sequencing to display several animations in a row
- Multiple sections displaying independent patterns
- Scheduling for set-and-forget holiday displays
- Color correction if you have multiple LED strips with slightly different colors from the factory
- Web UI with a modern appearance, compatible with both desktop and mobile
- Open source for unlimited customization, and an animation preview to make debugging at your desk easier
Prerequisites
- WS2811-compatible LEDs. I use the professional-grade HolidayCoro "Brilliant Bulb" because I don't want to climb on a ladder to replace bulbs every few years but you can use others.
- Arduino Uno or Mega. You only need a few pins but the 2KB of RAM on the Uno can be limiting especially if you're trying to drive hundreds of LEDs.
- Power supply. I use an ATX power supply and a breakout board that gives access to PS_ON and PWR_OK. You can use other types of power supply as long as it's compatible with your particular string of lights and has a way of turning on and off via TTL logic, e.g. a relay board
- Serial Server available from right here on nookkin.com
- A Windows PC running PHP and a compatible web server such as Apache. The web UI runs on PHP.
Introduction
Before you begin building your light show you should be aware of a few concepts:
- A color is sent in HTML format (without the leading #). Some predefined ones are included but you can easily add your own on the Colors tab.
- A pattern is a way to display a set of colors. Some are static, some are animated, and some are transitons designed to bridge 2 different patterns before and after (so some patterns have one set of colors and others have a primary and secondary set).
- A program is a sequence of patterns. Add one or more patterns, specify the colors, and specify durations of each pattern.
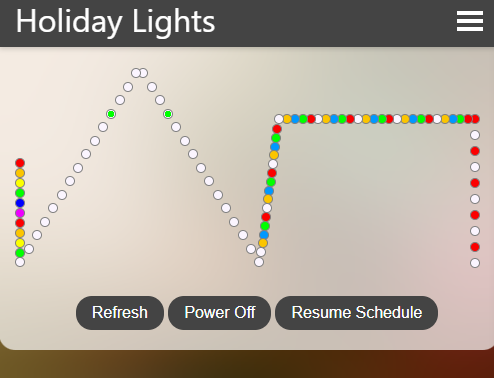
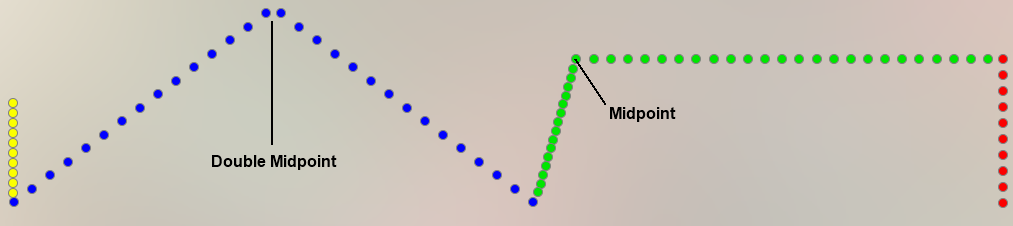
- A section is a subset of LEDs in your string. Some sections are linear and others have a midpoint, for example if you have a peak in your roof. (The midpoint doesn't have to be exacrtly in the middle.)
- A scene is what you're displaying. You can specify one program for all sections or can mix and match multiple.
Figure out where you want your lights to go. Are you putting them all in one straight line or following a complex roofline? If you're doing complex shapes you should count each LED and write down the beginning of each section as well as any corners or peaks (referred to as "midpoints").
Arduino configuration
Unpack your Arduino, light string, and power supply. Open the included HolidayLights.ino file in the Arduino IDE. This is full
of comments describing what each option does so go through it line by line and fill it out. Use the above image as reference; each color
is a different section and the midpoints are marked (including a "double midpoint").
Upload the sketch to your Arduino – hopefully there are no errors. Now wire everything up according to your sketch.
Windows configuration (web UI)
The web UI is technically optional – you could just send raw serial commands to the Arduino or even hard-code a scene if you only want one thing displayed. However it's much easier to use the two as a package. Additionally scheduling requires the use of an external system (such as this web UI) to handle automatically switching scenes each day. Once the web UI is running you can go outside with your phone and immediately see what the lights are doing.
Serial Server
Download Serial Server and extract it to a known location such as somewhere in your system PATH.
Determine the COM port used by your Arduino and configure the SerialServer.exe.config file appropriately. When you run
the server you should see a message indicating successful communication with your Arduino on the specified COM port.
Web server
The web UI requires PHP 7 and an appropriate web server (I use Apache but you can use IIS). Setting this up is outside the scope of this article but there are many resources available online for how to do this.
System configuration
Open the system.json file. If necessary, adjust the serial server parameters to match your serial server configuration.
Then update the "sections" array with the LED sections you have on the Arduino side (be sure to match the index in the array, but you
can change the name to whatever you want – this will be used when saving scenes).
At this point you should be able to run your web server and see the web UI running on your machine.
Scheduled task
For the schedule to work, you must create a scheduled task in Task Scheduler. This task must be set to run every 5 minutes (approximately), and must run the "schedule.bat" command with appropriate permissions.
LED preview
By default all LEDs are displayed in a line. If you want to display a more accurate view corresponding to the actual layout of your
LEDs, such as a roofline, you will need to edit the include\house.inc.php file and follow the instructions within.
Turning on the lights!
Go to the "Status" tab in the web UI. Click "Power On". This will turn on the default scene that displays one green LED for the start of each section you defined.
Choose one of the included programs from the dropdown and click "Set Scene". Verify that the scene is displayed correctly. Add multiple programs to display different things on different sections too!
Previewing animation
Click the "Animation" tab to render the animation and preview it in your browser. This allows you to test different animations without going outside and is especially useful for prototyping new animations if you modify the source code.
Adding colors
Colors need to be defined ahead of time. Some colors are included in the package but you can add as many custom ones as you want. The preview in the web server applies rudimentary correction to match the LEDs I used but this may not be entirely accurate, so you can test the colors on your actual LED strip before saving them. (Be sure to verify the color correction for multiple strips on the "Advanced" tab and the Arduino as well.)
Building a program
The "Programs" tab allows you to build sequences of animations with specific colors. This should be fairly self-explanatory. Choose a pattern type, a duration (how long it will take for a full cycle of that pattern), and add the appropriate colors. Click "Test" to immediately preview the program on the LEDs (or Animation tab), and click "Add New" to add it.
Setting a schedule
Go to the "Schedule" tab to edit the schedule. Specify a month and day to start, optionally a month and day to end, and define the scene that will be displayed on those days. (Currently there is no support for more complex logic such as "the last Thursday in December" but feel free to add it!)
By default the schedule will run from 4 PM until midnight on the specified day. Modify schedule.php if you want to change that.
Troubleshooting
Below are some troubleshooting steps in case things go wrong.
Can't communicate with the Arduino
Make sure the Arduino is plugged in and determine its COM port. Make sure SerialServer.exe.config is using the correct
settings. Navigate to SerialServer's URL and send the command /ping (not the "Ping" button) which should output gnip if all
is working well.
Random errors on the Status page
Sometimes the serial buffer on the Arduino has extra data in it. Click "Advanced" on the Status page and click "Flush" to flush both input and output buffer (or you can do this from SerialServer).
In the worst case you may need to press the Reset button on the Arduino itself or unplug it from power to fully reset it. This might happen when it runs out of RAM due to too complex of a program being specified.
Arduino can't upload code
SerialServer.exe will automatically start from the web GUI or schedule. If you want to update your Arduino's code, you need to stop the serial server, either via the "STOP SERVER" command on the advanced Status page or by killing the process in Task Manager.
I have 2 LED strips and the colors look different
Differences in manufacturing will lead to inevitable differences in display. You can specify per-section correction if you end up using muliple different LED strips. This can be done from the web UI as a preview and then hard-coded into the Arduino code to make it permanent.
Frequently asked questions
Why didn't you use a Raspberry Pi?
A $30 Raspberry Pi would have been the ideal device to run this project. However at the time of development, the cheapest Pi was well over $100. I already had an Arduino and numerous older Windows laptops so I went that direction. Feel free to port just the PHP/SerialServer portion or even the whole Arduino-based animation to the Pi if you have one.
Why didn't you use Linux?
I use Windows as my daily driver OS and am more familiar with it, so I stuck with what I knew. Additionally I had already made SerialServer for Windows to integrate Arduinos with Windows, so I didn't want to spend more time porting this to Linux.
Why are the colors in the web UI inaccurate?
While PC monitors tend to more or less display the same colors, LED strips are the "wild west". Some level of color correction is
built into the FastLED library as well as the Arduino sketch. However there's still a significant difference with the colors especially
at the lower extremes. To compensate for that, the web UI applies a logarithmic correction which helps to show dim colors more
similarly to how the LED strip will show them. (Without this correction most dim colors would look like black.)
Unfortunately this can have the opposite effect at the upper ranges of brightness
and is especially bad for neutrals and grays. If you're unhappy with how this color correction is done, go into include.inc.php
and modify the adjust function.
SUPPORT STATUS: This program is actively supported. You are encouraged to send suggestions and bug reports to the developer.
License
You are allowed to use this code with virtually no restrictions, i.e. you may use it for both private and commercial settings free of charge. However, you may NOT use this software as part of your own projects or compilations without permission from the developer.
![[XML]](/images/xml.png)
Comments (0)
Leave a comment